13.11.2023
926

What is realism? Realism is the depiction of objects through photorealistic interpretations. These interpretations can be shown through art, graphics, videos, films, and also applies to the 3D visualization of products. Realism has been used across generations to showcase images in their life-like form, whether it has been in films, the gaming industry, or in the field of product visualization. It has increased in popularity with the advancements of technology, due to the fact that objects on-screen can mimic it’s real life counterpart, helping customers imagine and sometimes feel the presence of the product.
This can be explained simply by a McDonald’s ad campaign. McDonald’s creates hyper realism videos of their burgers which show the juiciness of the meat, the softness of the bun and the sweet taste of the sauce. These images and videos created by McDonald’s evoke a range of emotions such as causing an increase in appetite and creating desire for the food they see. This form of repeated exposure using realism creates a psychological association within a consumer. Whenever this consumer walks past a McDonald’s restaurant, or sees their golden yellow arches, they are brought back to the moment they saw the adverts, inflicting a sense of desire for the food.
In this article, we explain how realism aids in the development and implementation of 3D visualization.
A photorealistic image is developed from the original look and feel of objects in a static or animated state. Getting the texture, shape, and color of the image to represent the original object and achieving photorealism, requires a computer with highly technical capabilities due to heavy use in the rendering process.
To achieve a realistic 3D visualisation, it is important to develop a model that is of high quality. By paying attention to the materials used on the model and utilising the correct setting of light and shadows in the 3D scene. If you’re able to match the model structure, the materials and the interaction of light to the real-life object, the more realistic the visualisation will become.
Below is the Pyramid of Photorealism, which shows the stages of creating a photorealistic 3D model:

By paying key attention to each of these stages, you will be able to produce a 3D model that equals or matches the photorealistic qualities of the original object.
The first step in developing a realistic 3D model of a smart-watch is to collect and study its references. During this step, it is important to define the structure of the developed model, study the materials used and their interaction with ambient lighting. In this example, a watch based on modern analogues can be used to show a realistic concept.
Let’s take a look at an example of an Apple Smart-watch:

When looking at the overall structure of the watch, the main body is made of aluminium alloys that have a slight sheen, the white strap is a smooth plastic material. Based on product reviews, this watch slips a little when playing sports. We will replace it with a plastic base so that the concept can be brought to life. When developing a 3D concept, it is important to pay special attention to the device’s screen, as it takes up the majority of space and acts as the main feature point.
Due to the convex shape of the watch, the curved edges of the object have a slight reflective glare. By also paying attention to the cylindrical button on the watch case and the fastening on the strap, we will add relief to it. By understanding the needs of a consumer, they may subconsciously feel for the relief (or risen) surfaces of the product, therefore we will create the mount from embossed aluminium
Another example from the Apple Smart-watch range:

As you can see, the display has three different effects on the surface: overall gloss, curvature gloss, and light reflection, which is expressed by the glare from the top of the screen. In addition, the strap itself has a slight bulging effect, which indicates rubber properties.
When creating a model of the watch display, the model itself should be as optimized as possible, which can be done using polygon shapes. The watch has an even rounded shape, the strap is thin and has a wrapped shape. When modelling a bracelet, we will use a denser polygonal mesh to create the most photorealistic model.

The model built according to this principle has no specific angularity, it is the elaborated details that add realism. When looking at the example image below, you can see where the strap connects to the watch body by using the depth of the bindings. This is known as the “cut”, many modellers simply connect the strap to the watch body without focusing on the details of bindings or relief effects. By adding this cut, the model is brought to life and where realism is shown.
Take a look at the detail of the polygonal mesh:

By reviewing the image above, you can see the creation of dense mesh across the watch strap and thinner mesh across the watch case and screen. And, since there is an opportunity to create a high-quality UV scan, correctly constructed mesh will maintain its structure within different light settings. Before creating a sweep of the model, each part is broken down into several parts, allowing you to easily remove the sweep and reassemble the parts back into a single model.
In the examples below, an HDRI map and two baked or finalised textures will be used. The HDRI image gives a soft multi-colored reflection of light, this example shows the depth of materials through reflections. Both images are different in their layout, conveying studio lighting and open space.

By adding an HDRI map, you may notice there are subtle reflections and curvature of the model materials. Yet, this layout doesn’t quite create the realism we’re looking to achieve. It is important to create shadows from light sources and self-shadowing of the watch elements.
To be able to create this effect;
As a result, the resulting image of shading and light is combined into a single image:

You can now see that the model combines both the shadowed areas and light from the HDRI map. Light, shadows and reflections create realism, the model has depth and the effects have created a rubber-like feel. By also paying attention to the bindings and strap holes, the small gaps and raised effects add further realism to the 3D model. We believe that beauty lies in the details.
When the light has been adjusted and shadows have been created, we have the base for the watch, yet there at not enough features on the model to show the photorealistic effects we are after. Namely, adding color and different watch features. As described earlier, the display has three effects on the reference images, and their implementation adds realism to the screen. So, we have now added the display to the working dial, you may notice that light overflows at the corners and across the glass itself. By removing the repetitive structures of patterns across the model, we see the model come to life.

And, that’s not the only detail we pay attention to. There is a light sensor underneath the watch that has reflection effects. This part of the watch is not just a cylindrical shape it is actually a rounded surface. Thanks to a well-structured and dense polygonal mesh, the model has further realistic properties.

As shown above, there are now 3D effects not only on the glass surfaces but also across the rubber, metal and plastic parts of the model. The side button has a slight flare, along with the aluminium mount showing a disc-shaped flare, the round button is embossed due to the light texture and normal map.
Rendering is carried out in a standard color palette using the interactive real-time rendering environment “Verge3D”. Before setting up the logic, it is necessary to carry out the final set of the scene.

Whilst setting up the rendering process, there may be further improvements that appear. For example, the need to lighten areas, add anti-aliasing, implementing color changes and adjust the shadows. In this example, the model is optimized so that it does not need separate color textures. Any color can be assigned simply by specifying the HEX code of the desired shade.
At this stage of configuration, small elements have been added to increase the model realism: a second hand on the clock and a working button has been added. By pressing this button, the watch screen switches to night mode. Added shading, implementing the point of view for the camera and limiting the vertical rotation angle is a part of the final implementation steps. These added features help create the most photorealistic layout of the model.

As a result, we have an excellent finalised model, that depicts the real-life qualities of the Apple Smart-watch.
It is also worth noting that adding an explosion button helps the client see how the model is divided into separate elements. This allows them to see all of the different parts the smart-watch consists of. In addition, a client can choose a variety of different colours and materials. Even the smallest features of the model, such as reflections on the rounded surface or a particular light setting, can increase product desire due to the photorealistic effects the model provides.
There are many different methods used to achieve realism in 3D visualization. Each approach is determined in relation to the product being developed, whether it be a piece of clothing or a multi-level building. Therefore, across these different cases, it is sometimes necessary to focus on light, and in others, on material effects or even embed animated objects.
In an example of a country house visualization, you can demonstrate the beautiful surrounding environment by adding animation of water in the pool, with sunbeams reflecting off the tiles. To create further realism, you can add the animation of swaying trees and even visualize fireflies flying over the plants at night. Sound can also be added. Having all of these different realism elements helps clients visualize their dream project, where they can get lost in the creation of different brickwork, structural work and interior design.
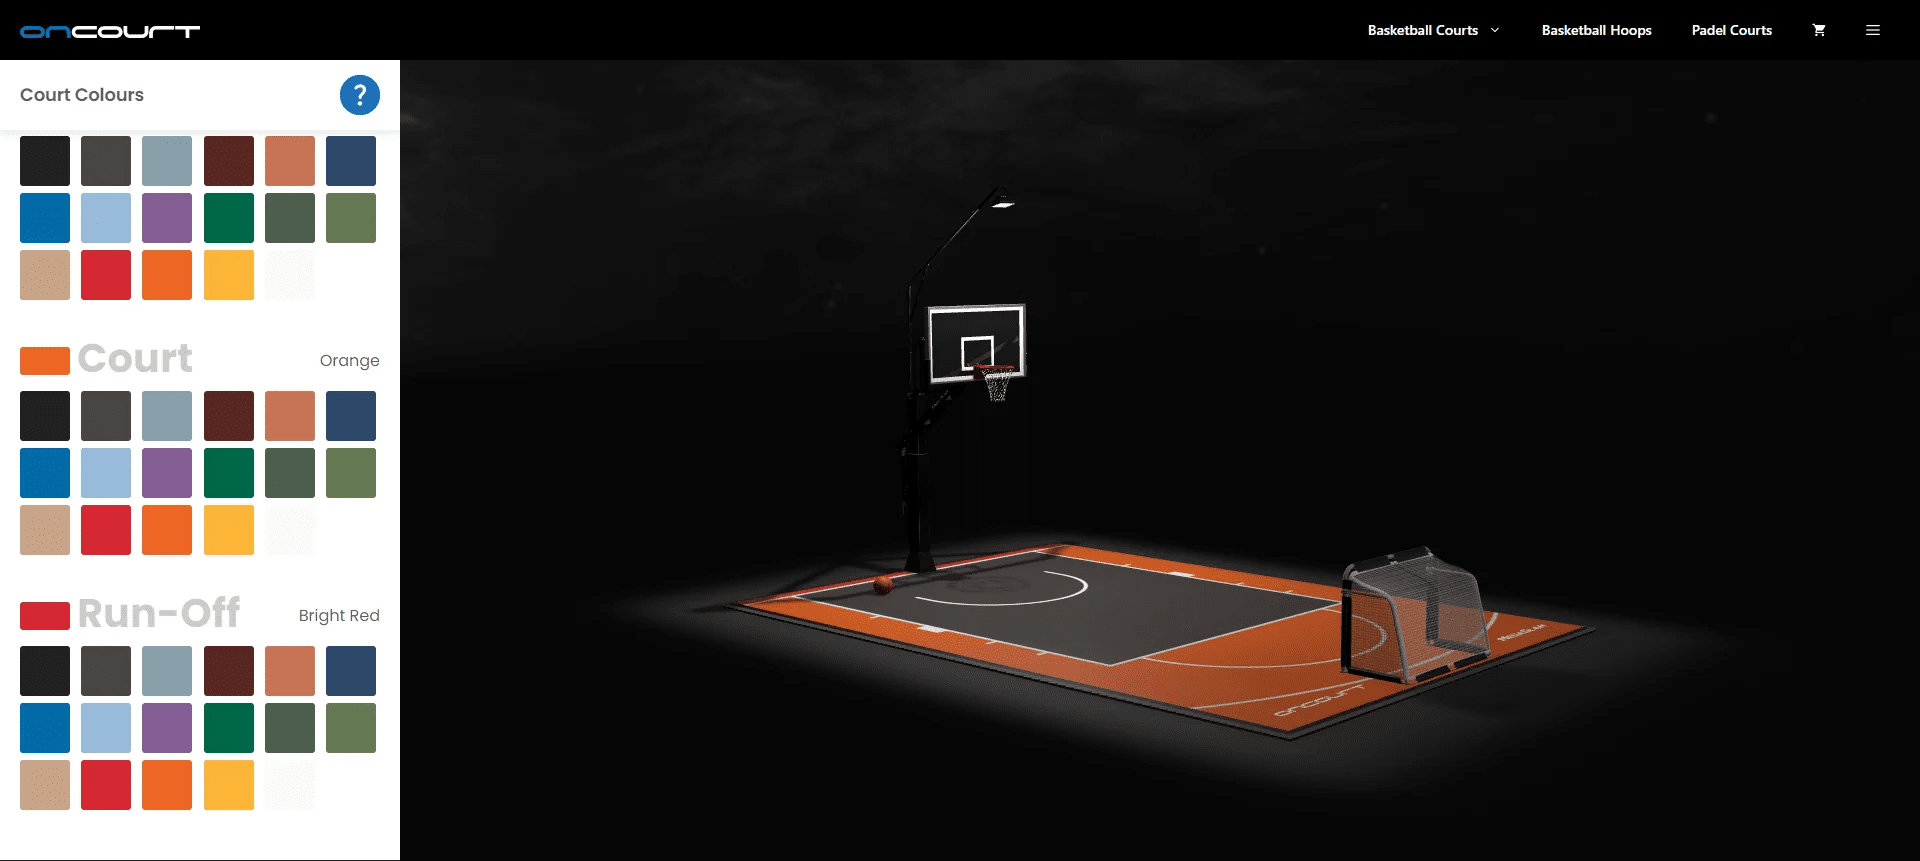
Implementing a well-developed 3D configurator on your website will enable you to streamline your business efficiencies and increase sales. This website function stands out from the competition, allowing you to gain further insights into the customers purchasing needs. Showcasing your products through photorealistic models, including 360-degree rotation, gives customers confidence in your products. Therefore, creating an unforgettable experience and association with your brand.
If you are interested in developing a 3D configurator that has an emphasis on realism, we will be happy to discuss further details with you! Please leave your contact details in the feedback form and we’ll get back to you as soon as possible.